- My Account
- Features
- Administration
- Agendas management
- User Base
- Communication
- Hardware
- Users reception
- Appointment
- Technical issues
My Account
-
Why choose the subscription?
The SaaS subscription system (Software as a Service) has many advantages:
- Budget watching
- You modulate your needs as you wish by increasing or decreasing the number of licenses.
Optimal availability
A simple Internet connection is enough to take advantage of your solution immediately
Innovation
You always have the latest version available (bug fixes + new features included)
All inclusive !
• Software maintenance, hosting, backups, updates.
• Access to our telephone platform (non-premium calls).
• Free assistance on software use (at isofunctional perimeter).
Maximum security
• The platform is regularly updated according to w3c recommendations and middleware’s editors (Automatic security flaws management) -
How to recover my lost / forgotten password?
To recover your password, just go to the login page. Then click on "forgotten password".
After entering your email address, you will receive an activation link via e-mail that will allow you to create a new password. -
Who do I have to contact about billing?
You can see your consumption: bo to Administration module
Menu Organisation
then go to Consumer tab
For any questions regarding billing please send an email to ESII - What are the rights of the various "roles"?
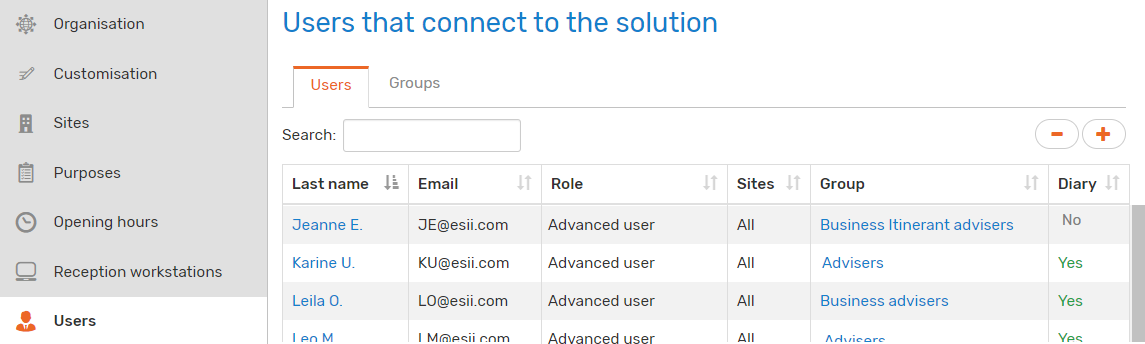
Each user of the Orion solution must be declared in the administration module in the corresponding menu called “Users”. For each person, you define their “role” that determines their access rights to the various Orion modules.
Several roles are offered:
- How do I configure the sender adresse of emails sent tu users?
You can customise the sender address of the Orion functions that create automatic emails for the various actors of the solution (users, advisers, administrators, etc.).
This can be done via the “Customisation” menu of the administration module:

Edit the “Sender address for emails” and then “Email signature” fields as needed.
For multilingual use, repeat the operation after changing the language to the right of the message tab.
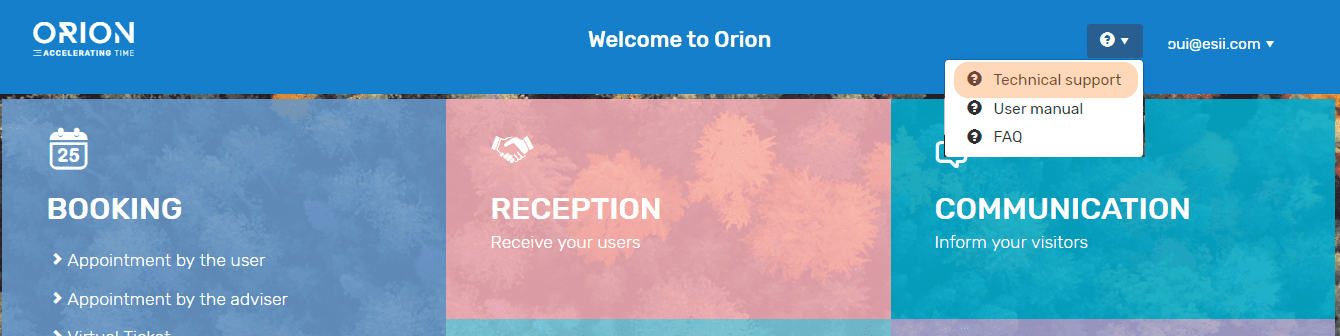
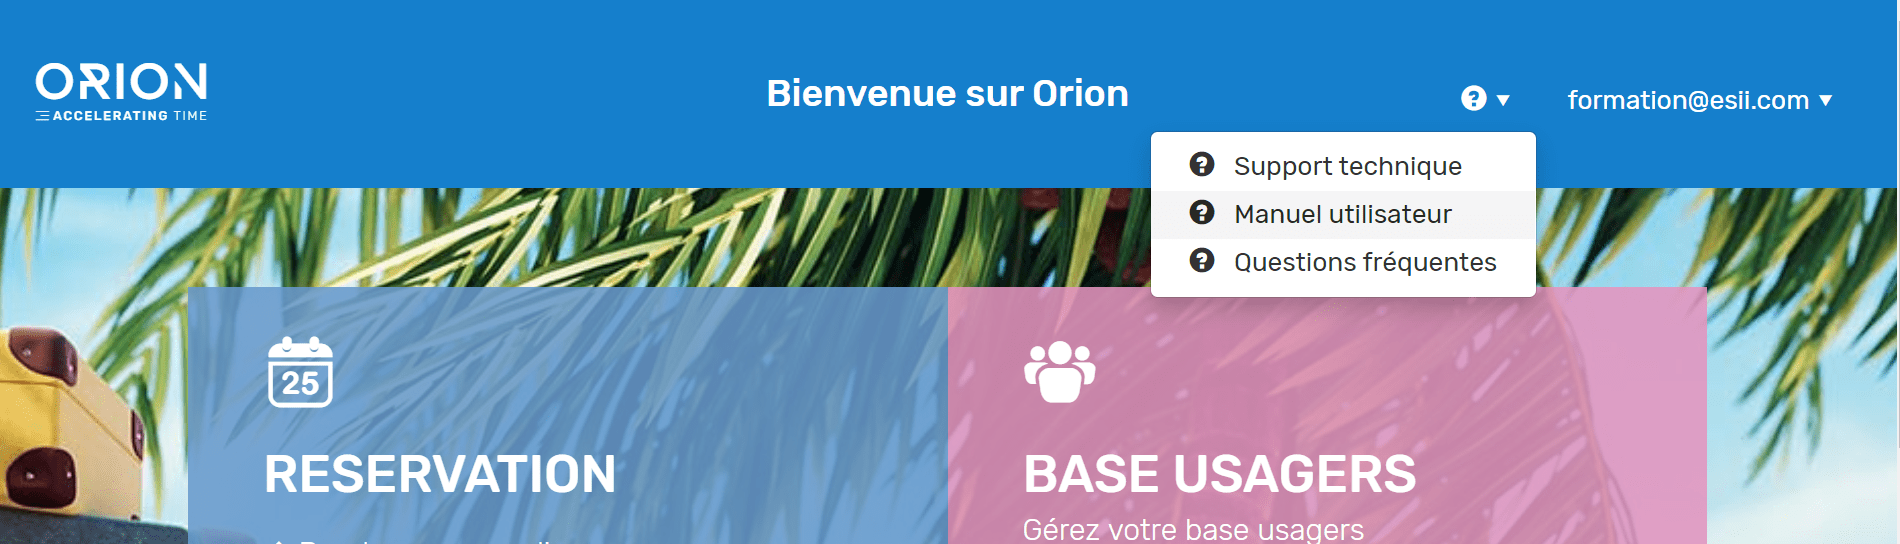
- How to access the Orion user manual?
The Orion user manual is accessible from the Orion portal.
By clicking on the
 menu, a drop-down list allows you to open the Orion manual.
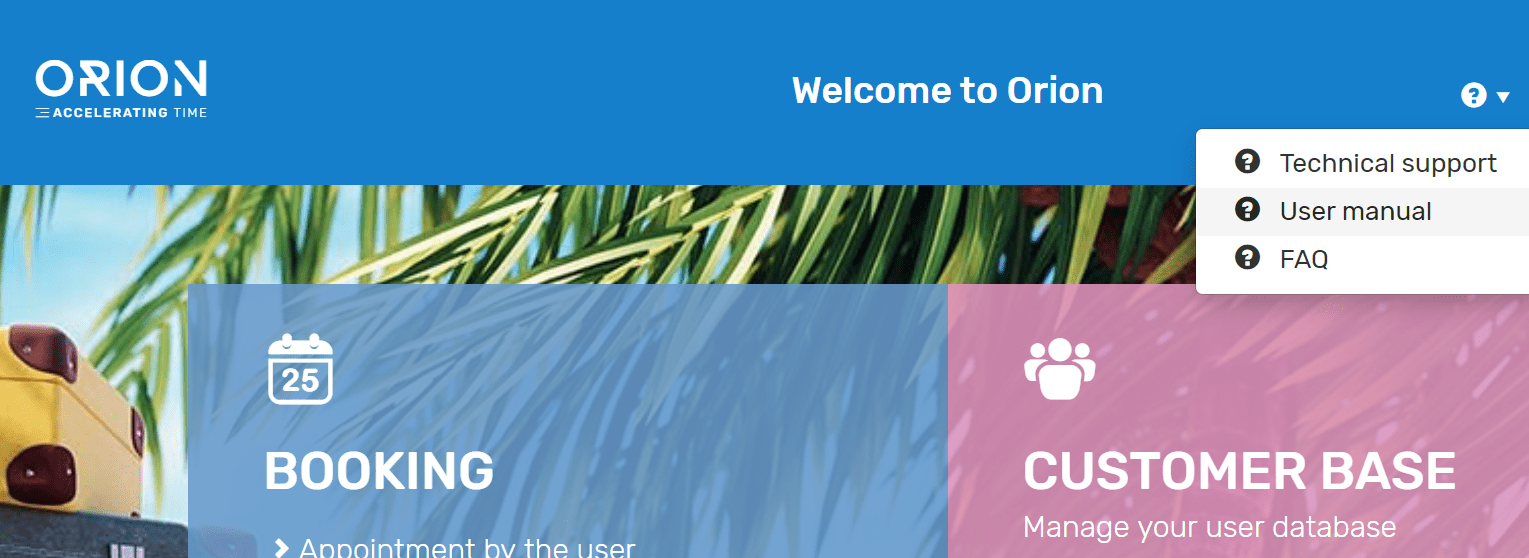
Note that a FAQ is also available, which provides answers to the most frequently asked questions.
- How do I contact technical support?
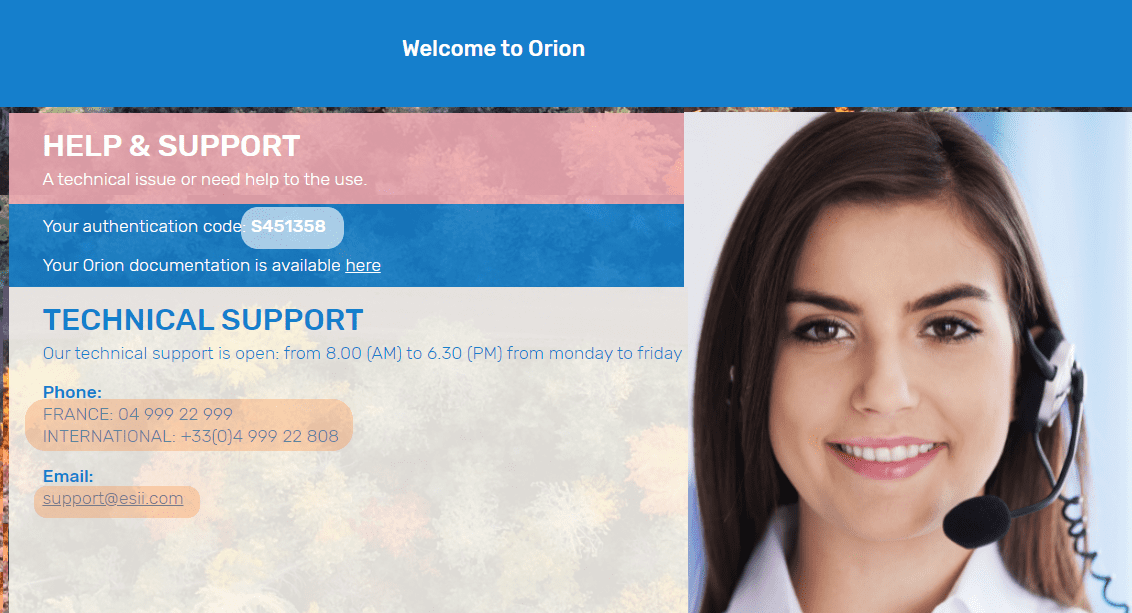
Contact information for your technical support is available directly on the Orion home page.
This information page contains the telephone and email contact information of Orion Technical Support, as well your authentication code to enter when calling.
Features
-
Can I take appointment with Orion on my mobile?
You can access to Orion on your mobile phone.For this you must have a smartphone equipped with a functional internet connection and an Orion subscription.
-
Which internet browser do I have to use?
We recommend that you regularly update your internet browser and operating system. Thus you will benefit from the most recent security patches.
Your planning is accessible from the following browsers: Google Chrome 70+, Internet Explorer 11, Microsoft Edge, Firefox 62+.
Also on tablet : Ipad, Samsung & Windows surface. - Pairing my hardware does not work.
As part of an ESII hardware installation, it comes with a device that enables automatic dialogue with the cloud server.
When the hardware is powered and connected to the Internet, it automatically displays a code allowing it to be paired:
- For a CTIP, the pairing code is displayed on the LCD screen.
- For a twana touch terminal, the pairing code is displayed directly on the touch screen.
- For a video screen controlled by our PC, the pairing code is displayed directly on the video screen.
Then, this code must be associated with the device configured in the administration interface of your system before validating the pairing. For more information, refer to the chapter "Receiving Devices" in the user manual.
If the pairing code does not appear, please check the following:
- If the equipment is not powered, test the power supply, for example by plugging a mobile phone with its charger and then visually checking its charge indicator.
- Visually check the indicator light of the power supply.
- Visually check the power indicator of the device (PC video, TECIP or CTIP).
- Check the Internet connection, connecting a laptop and / or checking the mains connection.
- Check network permissions, knowing that our products use an https connection (port 443) and an outgoing MQTT connection (port 8883)
In connection with the pairing of a device not provided by ESII, we cannot guarantee its compatibility and be held responsible for its non-connection.
Visit purposes
-
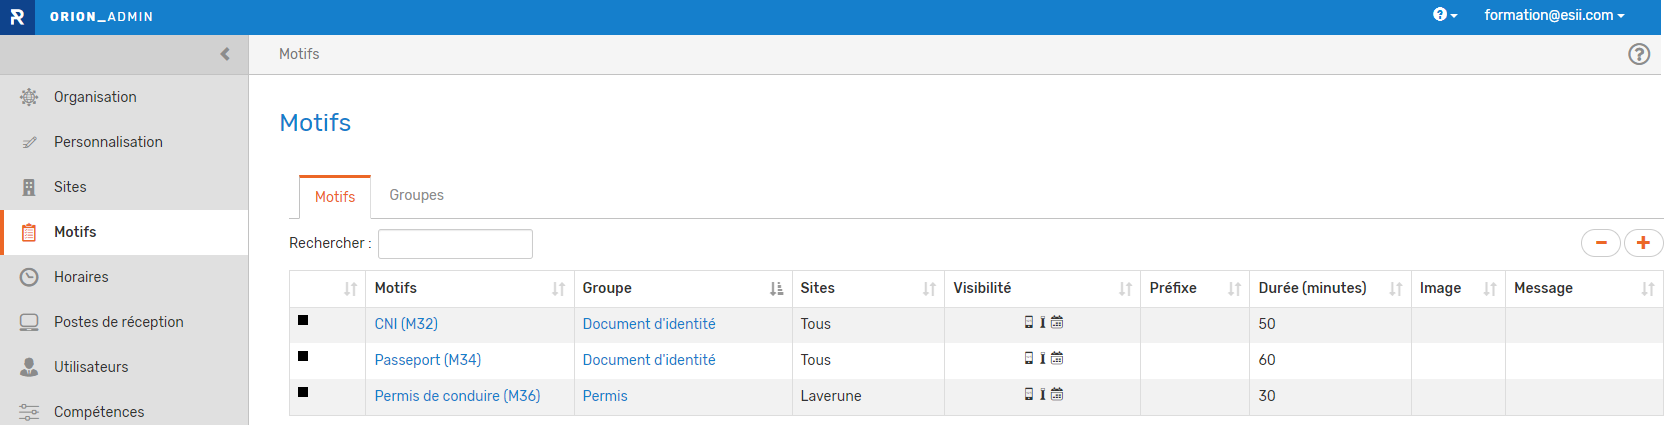
How do I declare my visit purposes in Orion?
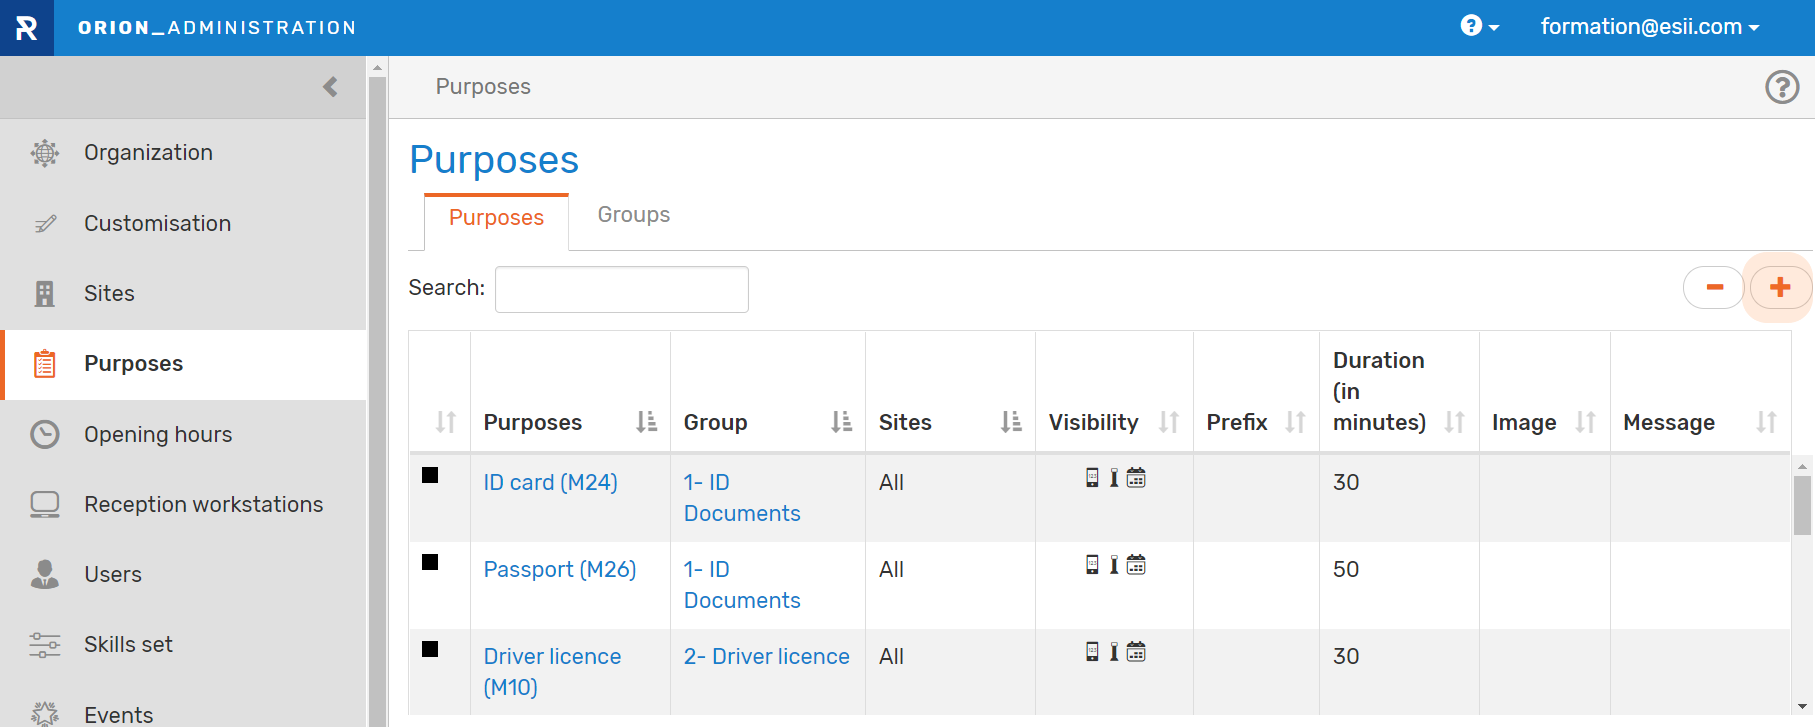
The declaration of purposes is made in the "Purposes" menu of the Administration module.
In the "Purposes" tab, the
 pictogram allows you to add a new visit purpose.
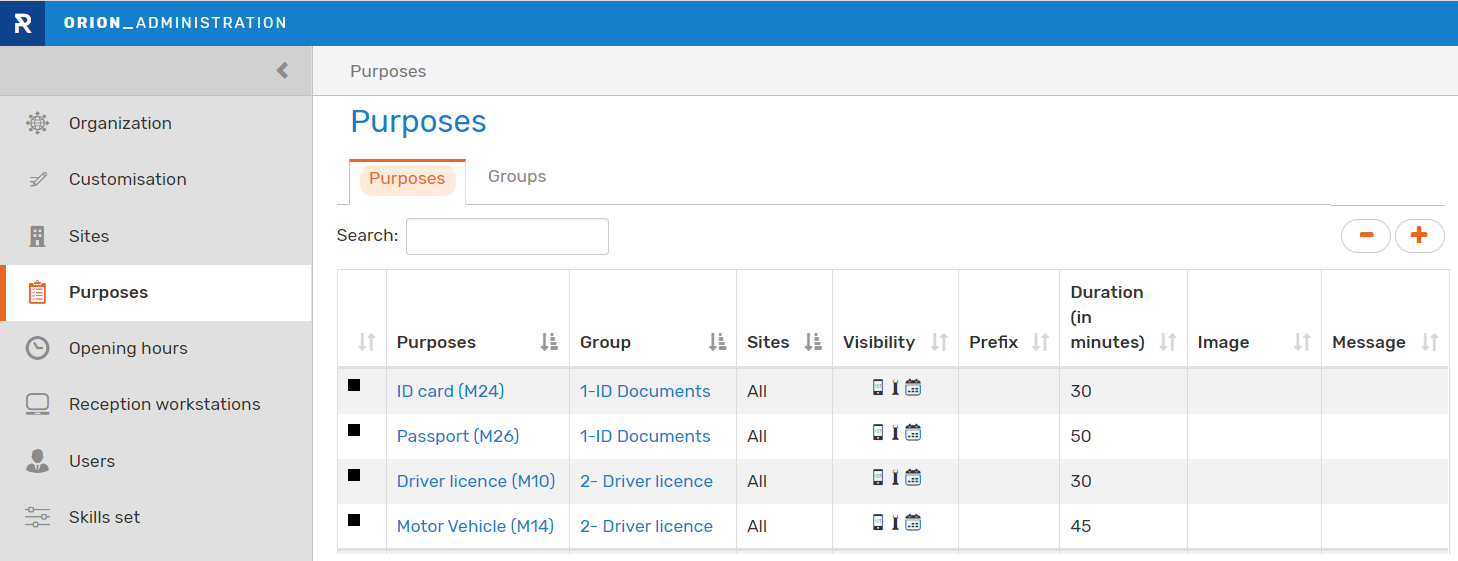
The creation of a reason is presented in the video "Discover Orion and its settings" in the Webinar section.
Note that a purpose must be assigned to a group.
You will be asked for the group to which it belongs when you create it.
Before creating a purpose, check in the "Group" tab that there is a group of purposes to which you can assign it.
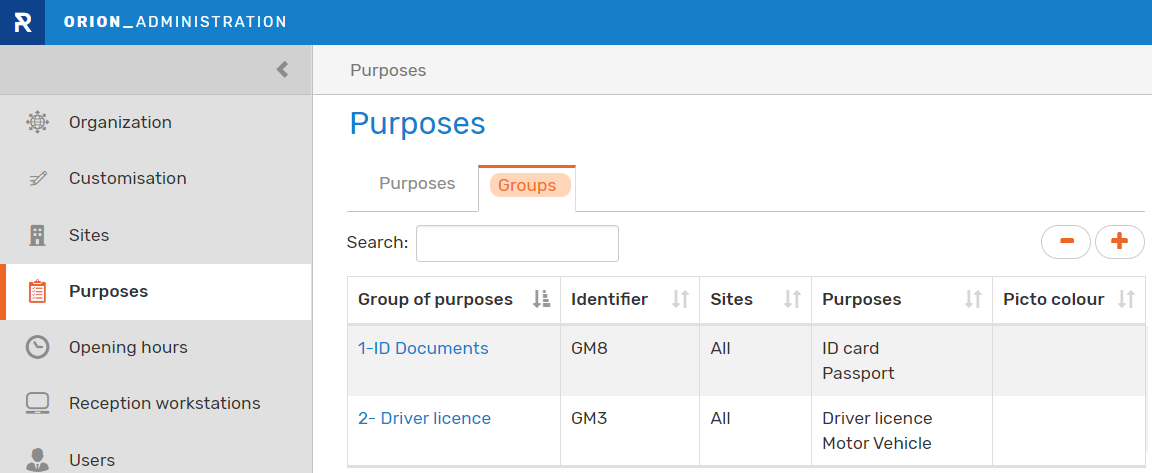
Example:
The "Groups" tab lists all the purpose groups created (1-Identity documents and 2-Permits).
If you want to create the purpose "Childcare registration", you should add a new purposes group, called for example "childcare and pre-school".
Click in the
 pictogram of the "Groups" tab to add a purposes group named "childcare and pre-school". Then return to the "Purposes" tab, to add the "Childcare registration" purpose by clicking on the
  pictogram.
Then think of defining the skills of your resources (your counters or your advisers) on this new purpose created in order to ensure the reception of the users who will come for this purpose .
To help you in the assignment of competences, do not hesitate to consult "Can we prioritise the reception of a user according to his or her purpose for visit? in the Visit Purposes section.
What is the purpose of call prefix ?
By default, the numbers of the tickets issued follow the same series, regardless of the reason selected by the user.
The number assigned defines the order of arrival of the users, and consequently their order of reception.
If some of your reasons are given priority,
The order in which the users are called will depend on the reason entered, and not on the order of arrival of the users.
In this case, be sure to assign call prefixes to your priority reasons, to differentiate the numbers assigned to these different queues.
- How do I assign separate call prefixes to the purposes for visiting ?
By default, the numbers of the tickets issued follow the same series, regardless of the purpose selected by the user.
When you apply prioritisation to certain purposes, the order of reception of users no longer respects their order of arrival.
In this case, take care to assign different call prefixes to these purposes to avoid misunderstanding by users.
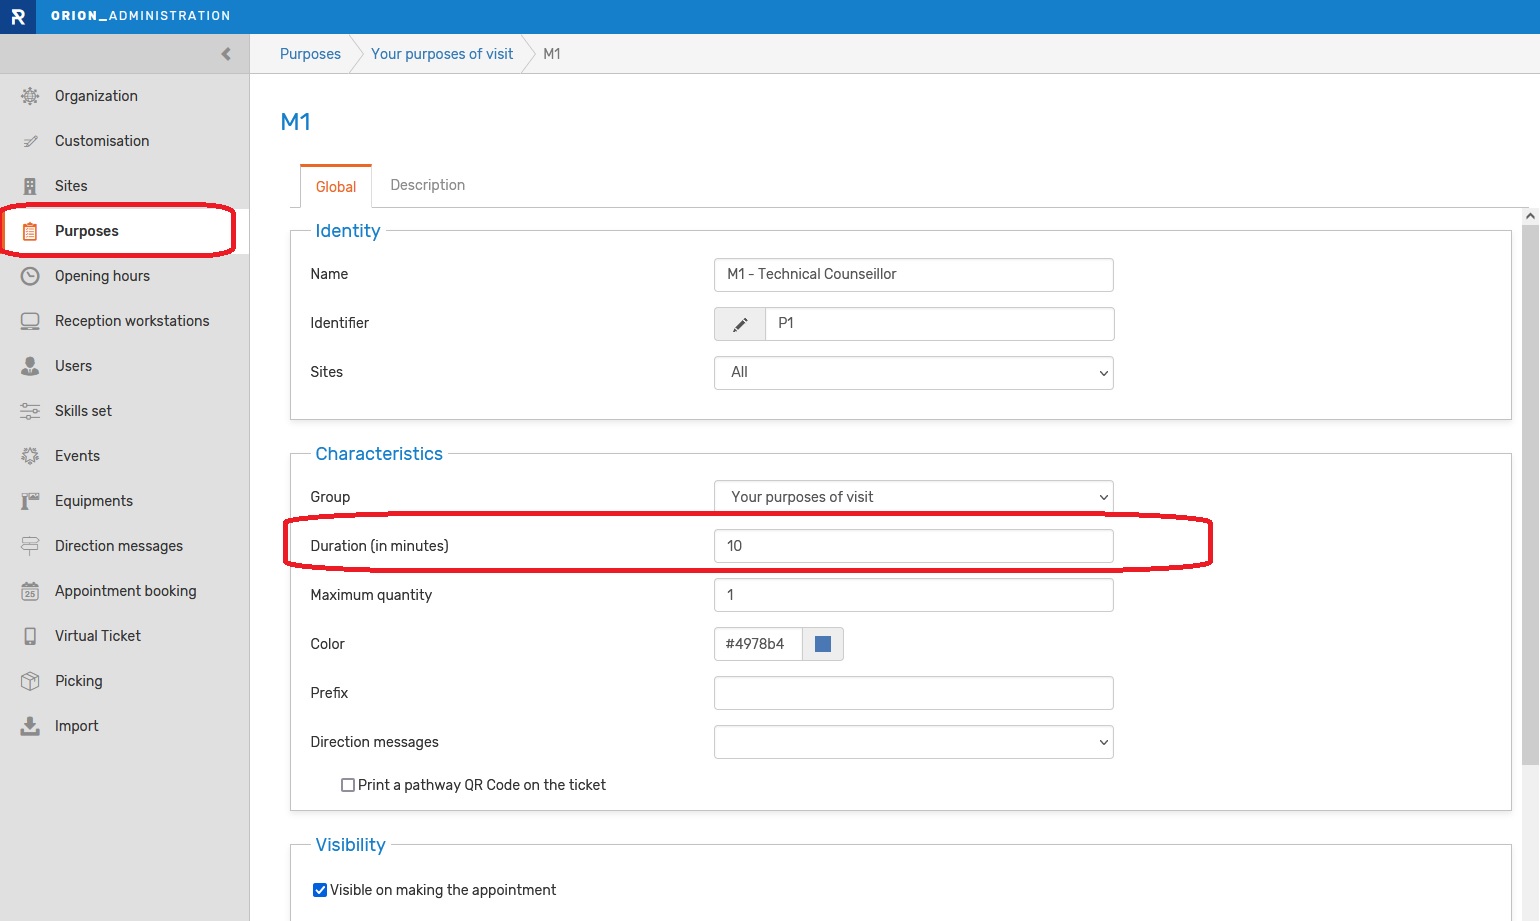
To assign a call prefix to a purpose, go to the "Purposes" menu in the Administration module, to list all the created purposes :
Click on the purpose name to access its parameters and assign a prefix:
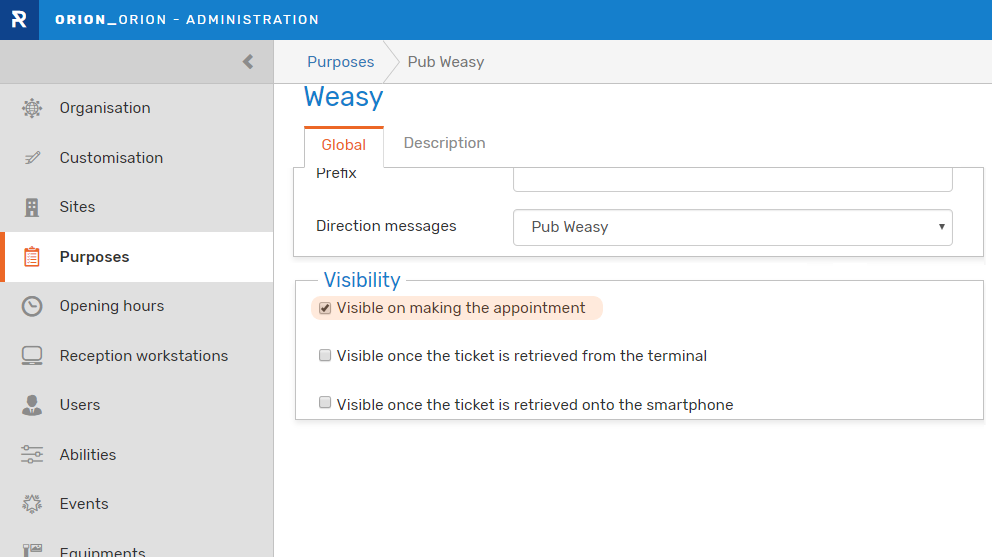
- How do I permit making appointments online for a purpose?
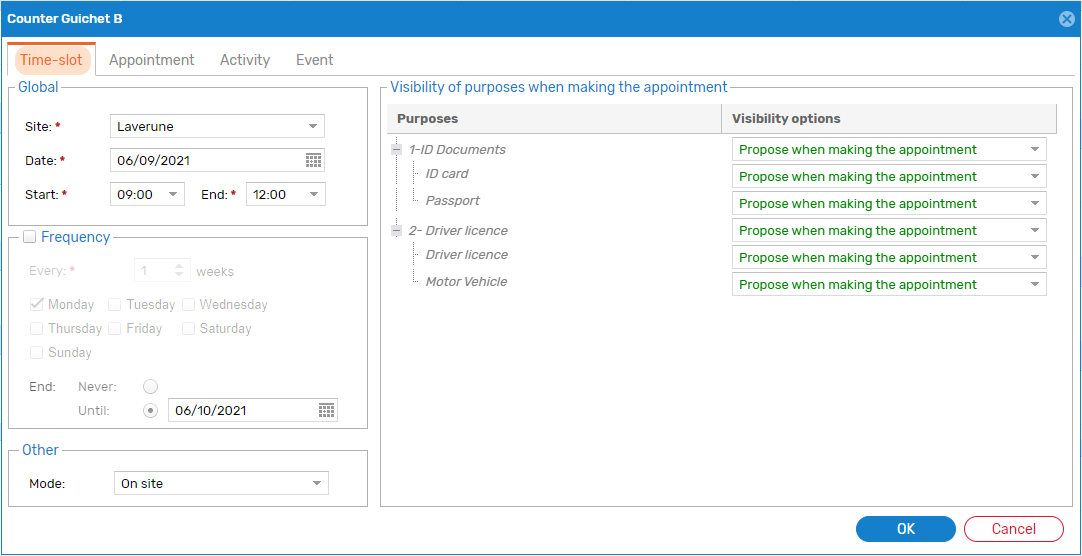
Permit making appointments online for a purpose, by checking the “Visible on making the appointment” option in the settings of the selected purpose.
This is done through the “Purposes” menu of the administration module:
Then consider assigning abilities to your resources on this purpose (See "How do I assign abilities to my resources?").
Also consider creating a booking time slot on this purpose on the resources concerned (See "How do I assign a booking time slot?").
- Can priority be given to receiving a user according to the purpose for their visit?
To prioritise receiving users according to their visit purposes, simply change the “abilities” of your resource groups (users/workstations).
By assigning a “Main” ability level to your resource groups on a purpose, you give priority to receiving users for this purpose, compared to the other purposes that are managed with lower abilities (such as “High” or “Low”).
This is configured through the “Abilities” menu of the administration module:
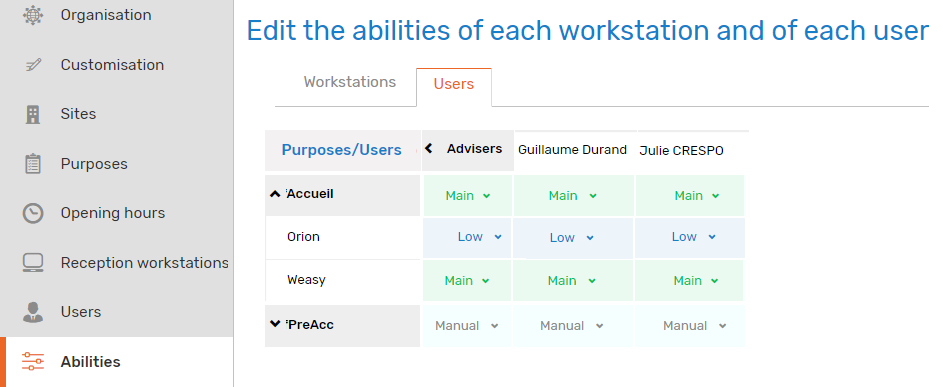
Here, the “Weasy” purpose is given priority compared to the other purposes for all the advisers.
For more information about abilities, please read “What are the possible ability levels?”
Prioritising certain purposes leads to a different reception speed depending on the purposes. Also consider assigning different call prefixes to your purposes (See “Can I assign separate call prefixes to my visit purposes?”).
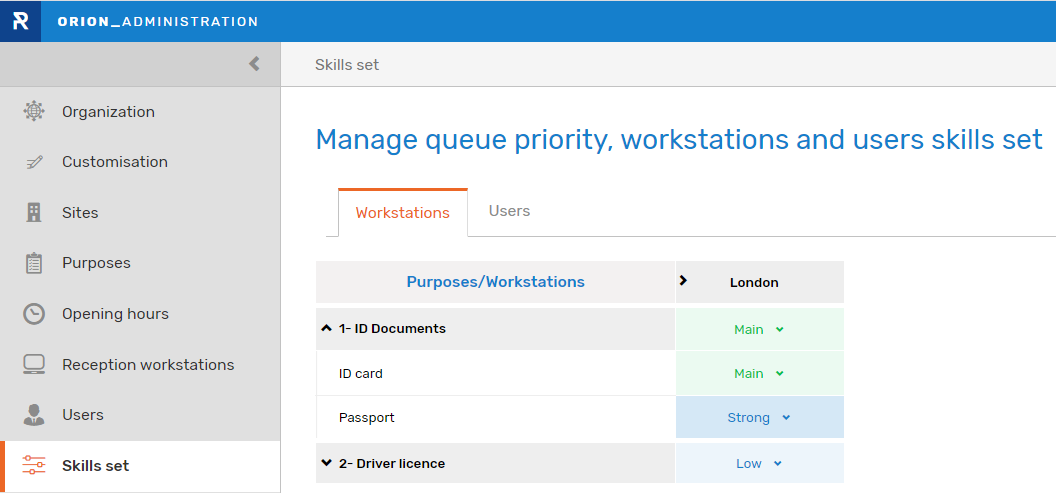
- Can different abilities be assigned to the resources of the same group ?
The “skills” of your workstations (or advisers) are defined in the tab of the same name in the Administration module:
There are 3 levels of assignment of skills in order to answer all the cases of figure:
Case 1: Assignment of skills at the level of workstations (or advisers) groups and purposes groups :

The group of workstations named "London" has different skills on the two groups of reasons:
As the skills of this group of workstations is higher on the purposes group "ID Documents" (MAIN) than on the purposes group "Driver licences" (LOW), it will prioritise serving users who have come for a purpose from the purposes group "ID Documents".
Case 2: Assignment of skills at the level of workstations (or advisers) and purposes groups :
The "London" workstations group has different competences on the two purposes belonging to the "ID Documents" purposes group:As the skills of this workstations group is higher on the "ID card" (MAIN) purpose than on the "Passport" (STRONG) purpose, it will serve users who came for the "ID card" purpose as a priority.
Case 3: Assignment of skills at the level of workstations (or advisors) and purposes :
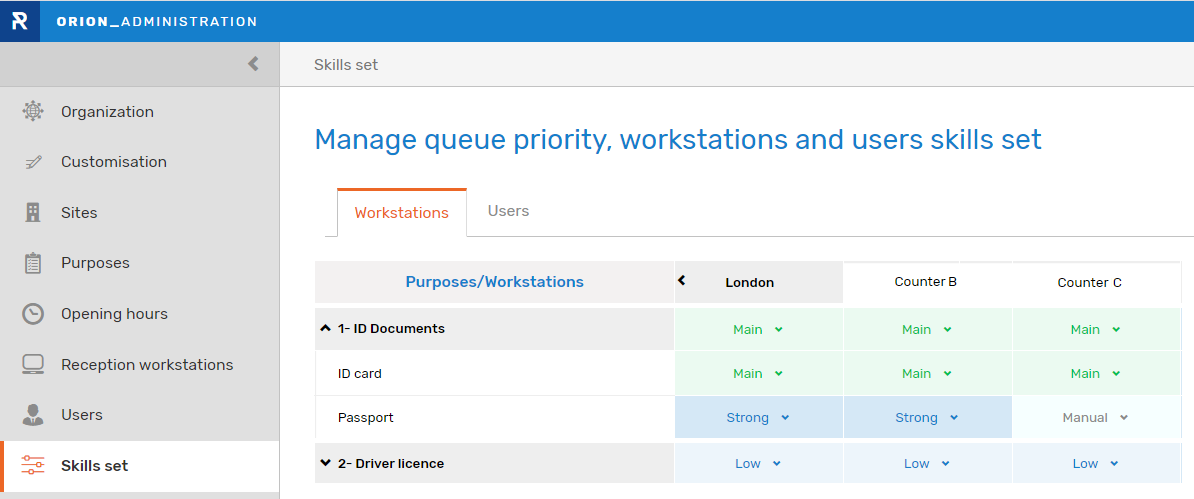
In this case, counters B and C have different competences on the "Passport" reason, this reason will be served by counter B, while counter C will have to use the "Receive" action to take care of users who came for this reason.
To complete this topic please watch the video “Discover Orion and managing abilities”.
- What are the possible ability levels?
Five levels are available in Orion, listed below:
“Main” This level indicates an absolute prioritisation in dealing with users who come for this visit purpose. This means that an adviser who has this level of strategy for one or more purposes will only call users who have come for this/these purpose(s). When no more users are waiting for these purpose(s), the adviser can then receive users who have come for the other purposes for which they have lesser strategies, such as “High” and “Low”.
“High” and “Low” These are levels for dealing with users that are strictly lower than the “Main” value. The "High" value signifies 30 times greater support than the “Low” value.
“Manual”: This level allows a user to be selected from the list by a manual action of the resource. For information, please watch the video “Discover Orion and managing abilities”.
“Unmanaged” The purpose is never served by the resource.
Agendas management
-
How do I assign a booking time slot?
A booking slot is a time slot allocated for online appointment booking.
Reservation slots are assigned to the agendas of your counters (or your advisors) in the Agenda module.
A slot on a workstation (or advisor) opens that slot on the purposes managed by the workstation (or advisor) with the possibility to filter on certain purposes only.
NOTE: Move the mouse over the name of the window to see the groups of reasons it manages.
A range can be programmed periodically for long-term planning.
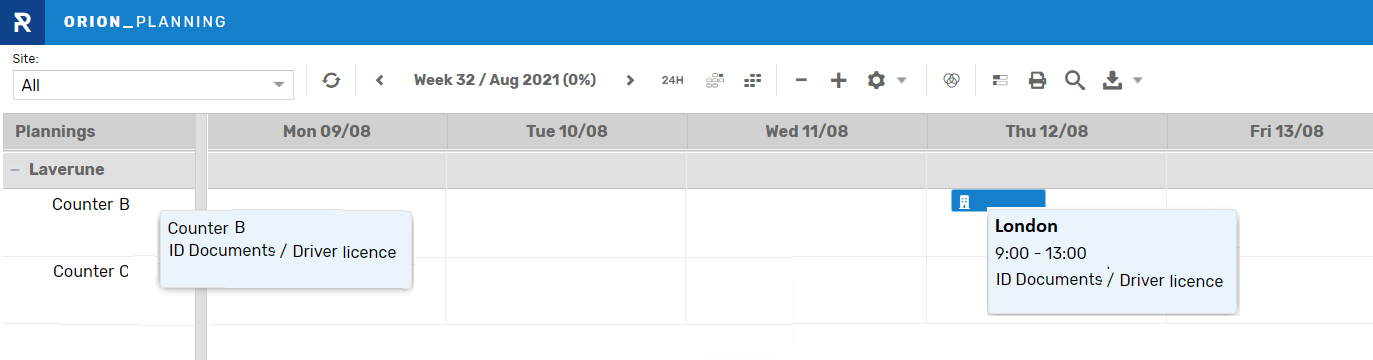
In this case, a time slot has been created at counter B on Thursday 12/08 from 9:00 to 13:00, for the "ID Documents" and "Driver licence" purposes groups.
This translates on the Booking module into availability on the slot and on the purposes defined in the slot:

For more information, see the video "How to set up a booking slot ?" in the Webinar section.
- Are public holidays handled by the diary?
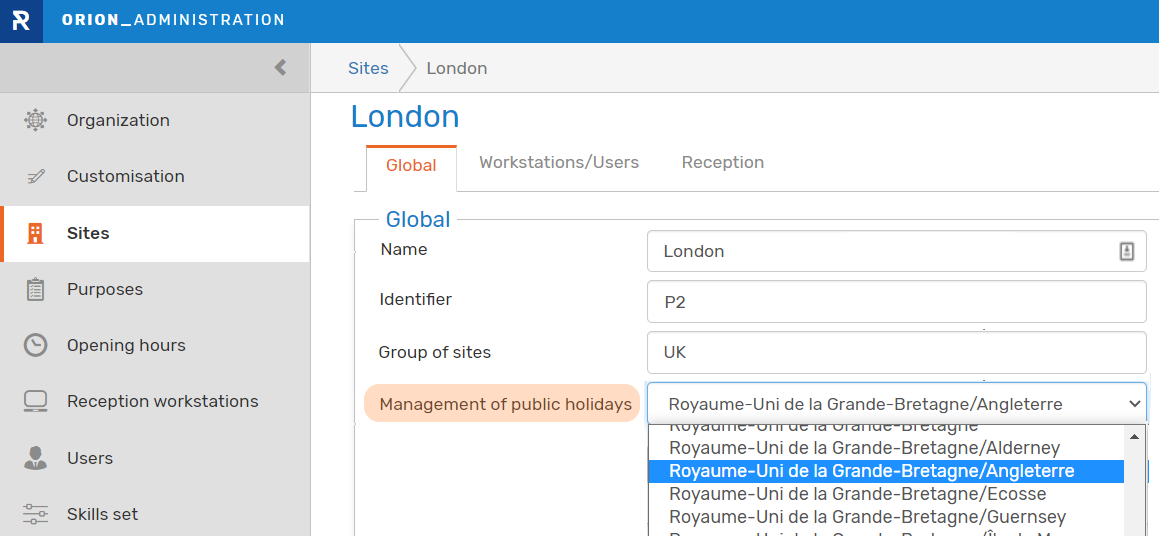
The objective is to set up the system to avoid creating time slots on public holidays when creating a periodic time slot.
This setting depends on the geographical area of your site.
Select thus your site in the list displayed in the "Sites" menu of the Administration module.
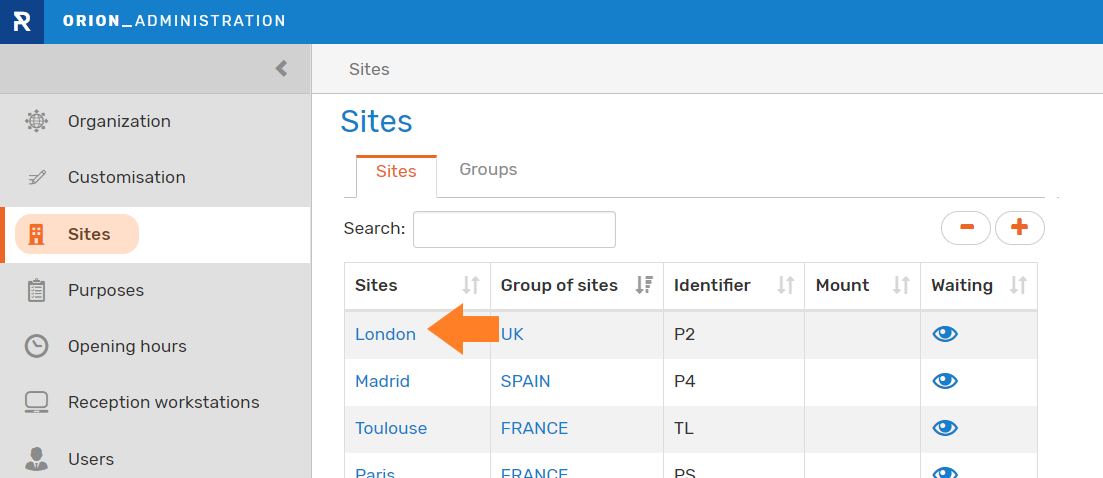
In the "Global" tab, fill in the "Public holidays management" field by selecting the country corresponding to your site:
- Know the occupancy rate of the booking slot?
In the Planning module, there is an option that allows you to view information on the occupancy rate of the slots (expressed in hours) for a chosen period (expressed in days).
A click on the orange highlighted symbol opens a popup displaying this information.
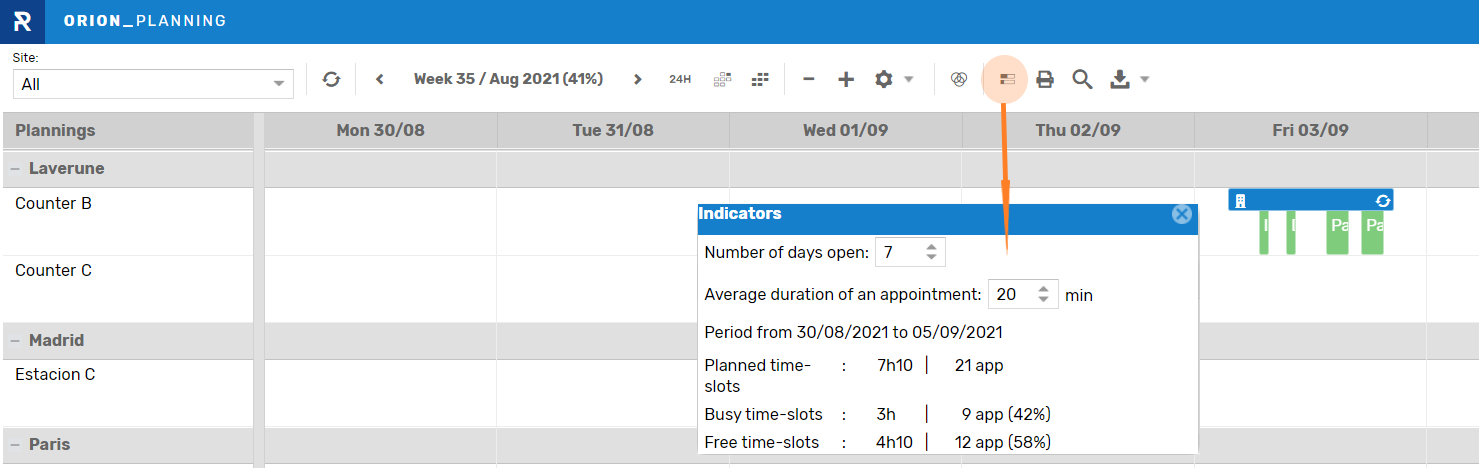
In addition, you can use the control module to obtain this kind of information.
- Is it possible to enter advisers'holidays in the diary (Planning module)?
It is entirely possible to manage the various activities of your employees in the Planning module by using a task named "Activity".
For that, simply create an "Activity" on the resource concerned (workstation or adviser).
To do so, select the wanted time slot directly on the resource diary, using your mouse.
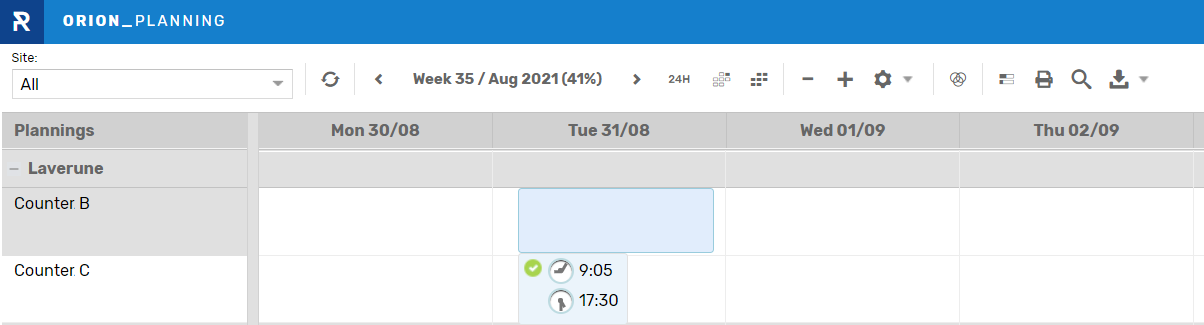
When you release the mouse, a window opens on a "time-slot" tab.

Click on the "Activity" tab and set up the task.
-Apply a periodicity since this task extends over a certain period.
-Assign a name to this activity, "Holidays" for example, as well as a colour. The system'll automatically memorises the characteristics of this task (name and colour) and will suggest it to you the next time you 'll create an activity.
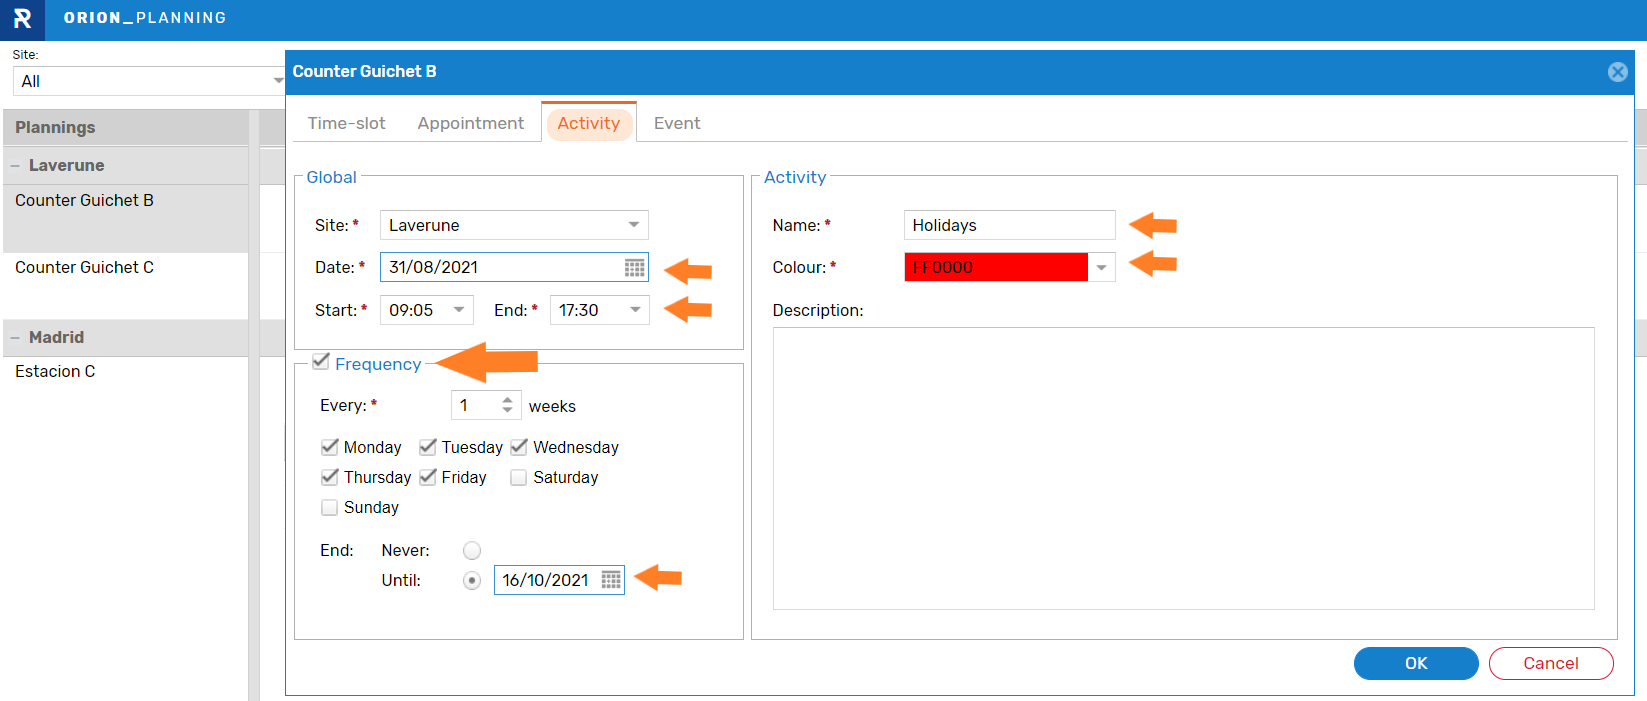
The advantage of entering holidays in the calendar beforehand is that it prevents the creation of any other task on the defined slots.
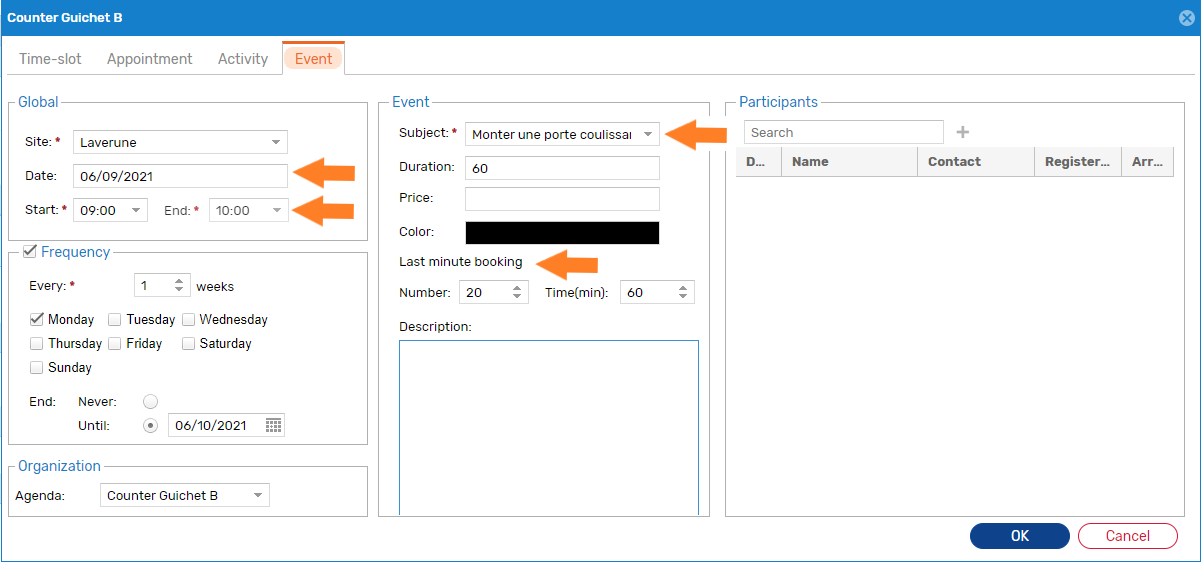
- How to organize an event?
The organisation of events is done in two steps:
- The first step is to declare the type of event in the Administration module (name, duration, capacity in number of participants, price, etc.). You will find the details of this step in "How to declare an event?".
- Once the type of event has been declared, you can plan it in the Calendar module. You will find information about this step in "How to schedule an event?"
- How to declare an event?
The "Events" menu in the Administration module allows you to declare events:
The "Objects" tab lists the different events created.

To add a new event you have first of all to define the group to which this new event belongs.
To do so, click on the "Groups" tab to check if there is an event group in the list to which you can link your new event.

If there is no suitable group, create a new event group by clicking on the
 pictogram.
 Then go back to the "Object" tab to add the new event by clicking on the
 pictogram.
The interface for creating the new event displays a "Global" tab allowing you to define its characteristics (its duration, price, maximum and minimum number of participants, etc.).
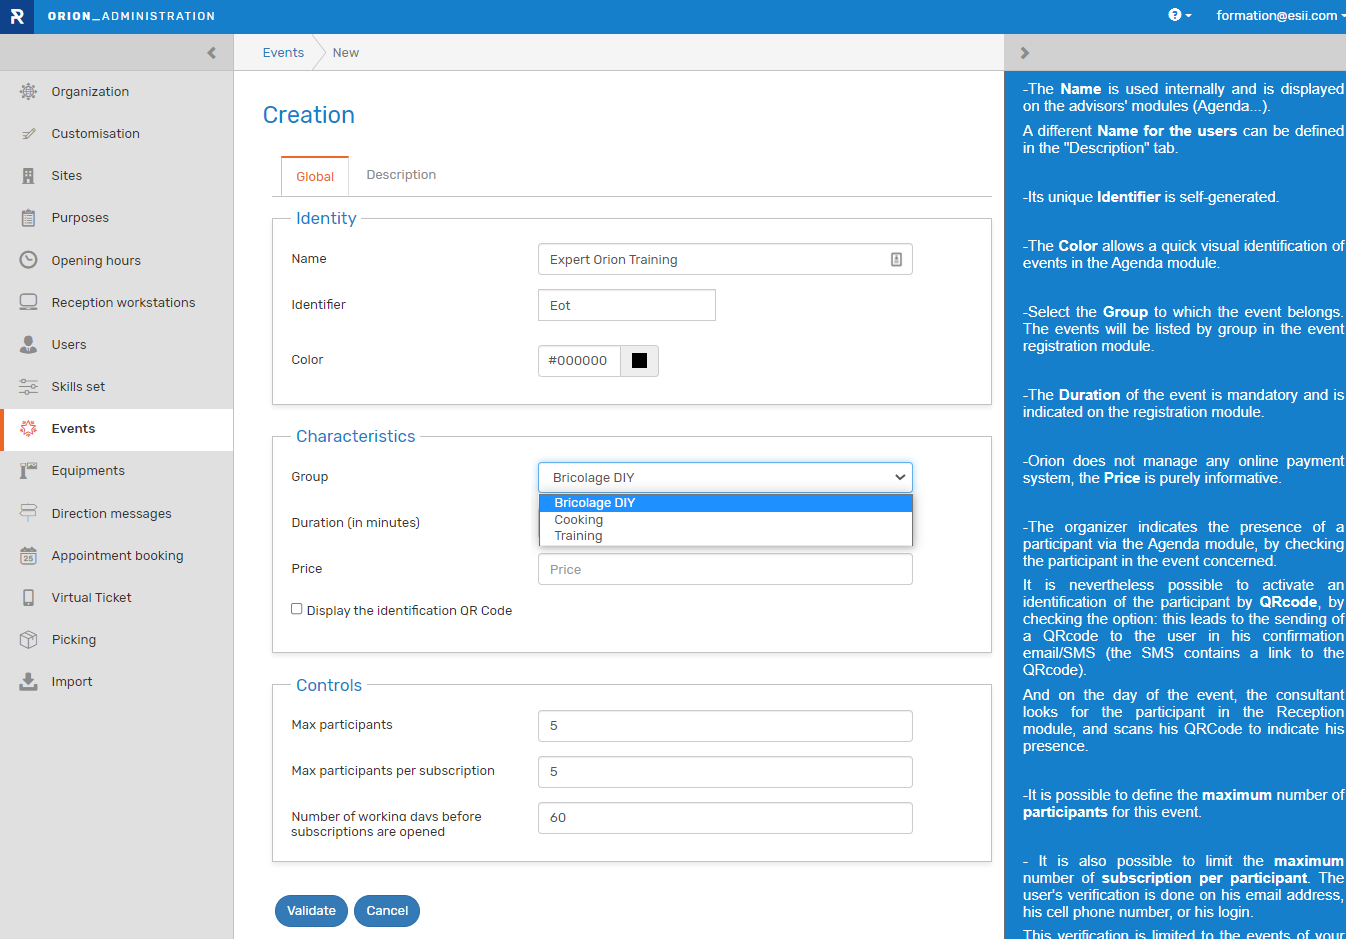
Please note that the online help (the blue section on the right) gives you all the information you need to enter the required fields.
Once this tab is filled, Confirm your entry by clicking on the "Validate" button. This will send you to the "Description" tab.
Fill the "Description" if necessary.
You can now plan your event in the Planning as shown in "How to schedule an event?"
- How to schedule an event?
Scheduling events is done in the Planning module.
Launch the interface to display the agenda of your workstations/advisors.
Select the desired slot on the agenda of the workstations/advisor in charge, by holding the left click of your mouse.
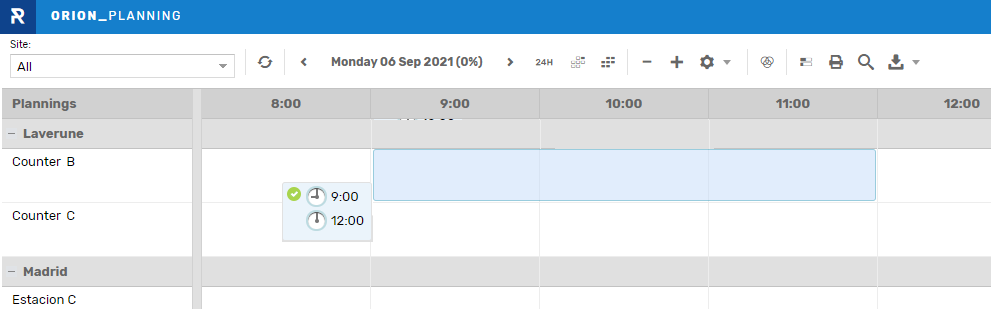
When you release the mouse, a pop-up window opens on the "Time-slot" tab.
Go to the "Event" tab, and fill in the information:
- Modify the site, location of the event if necessary
- Readjust the times (begin and end)
- Apply a frequency if necessary
- Select the subject of the event from the drop-down list
Finish by clicking on the "OK" button
Note that the colour of an event can be used to distinguish it from other scheduled events type.
Management of user base
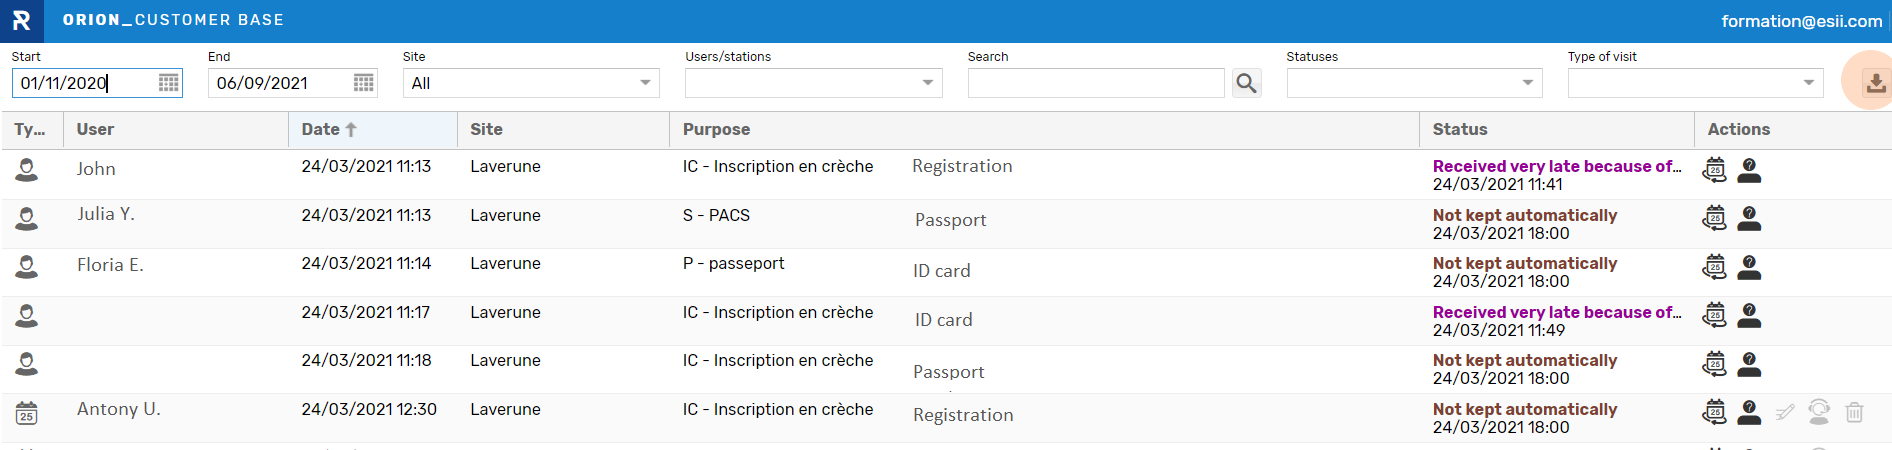
- Can I print out the appointment of a day?
The Customer Base lists all the visits to your sites.
You can print or export the results page of your searches to a CSV file by clicking on the highlighted pictogram:
Video & Communication
-
Can users be called by their name?
Users can be called by their ticket number or by their name if this is known to the system, as is the case for appointments.
You set “the display mode” in the settings on your screen, accessible in the “Equipment” menu of the administration module.
Select the value "by name" for the "User Display Format" field.
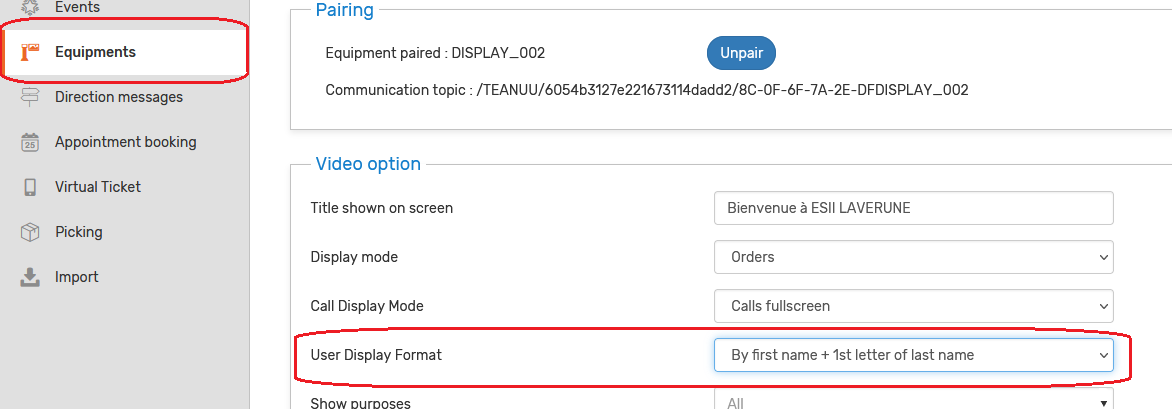
Note: The display mode is specific to each video screen.
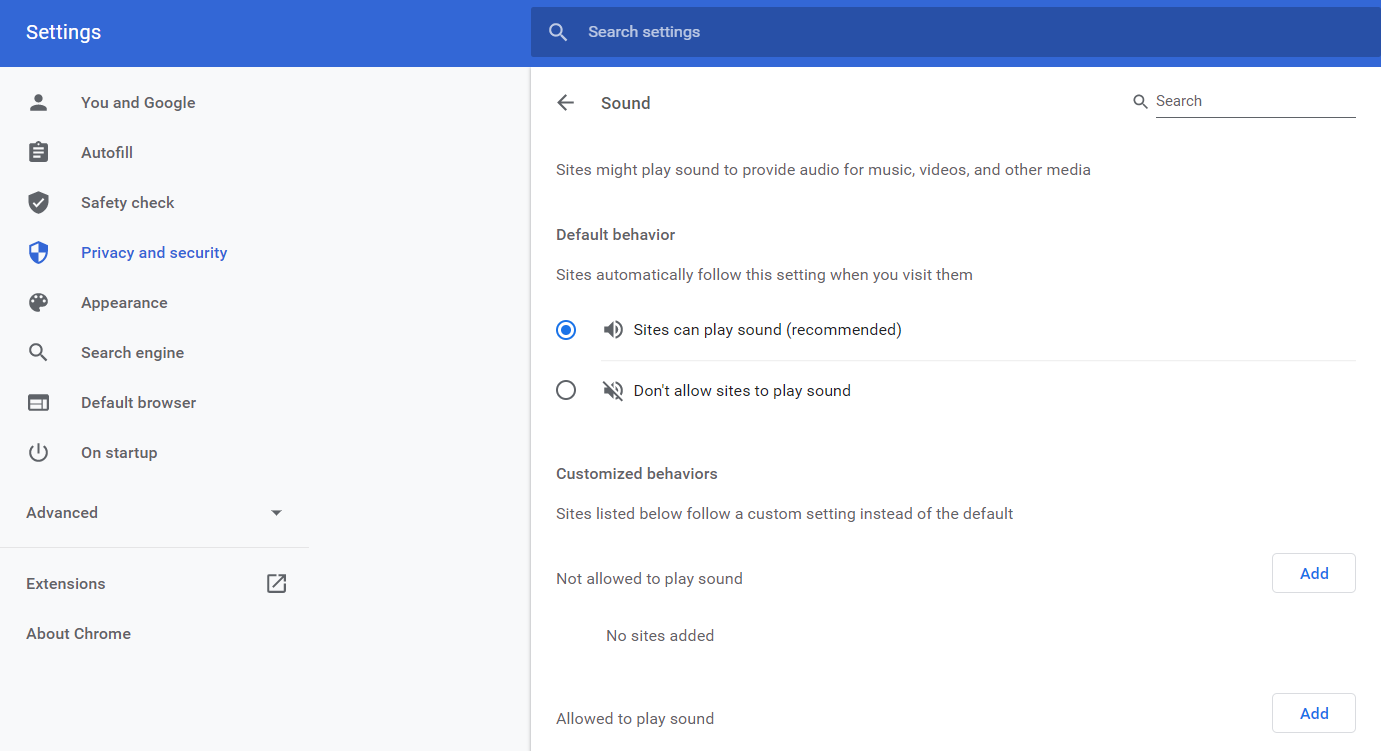
- How to activate the sound of your video screen if you use a Google Chrome browser?
NB: This section concerns customers who have neither Neoplayer nor the ESII box, and who use Google Chrome directly to launch the call module on their video screens.
1- Launch your Google Chrome browser
2- Enter the following address in the URL to display the sound settings " chrome://settings/content/sound ":
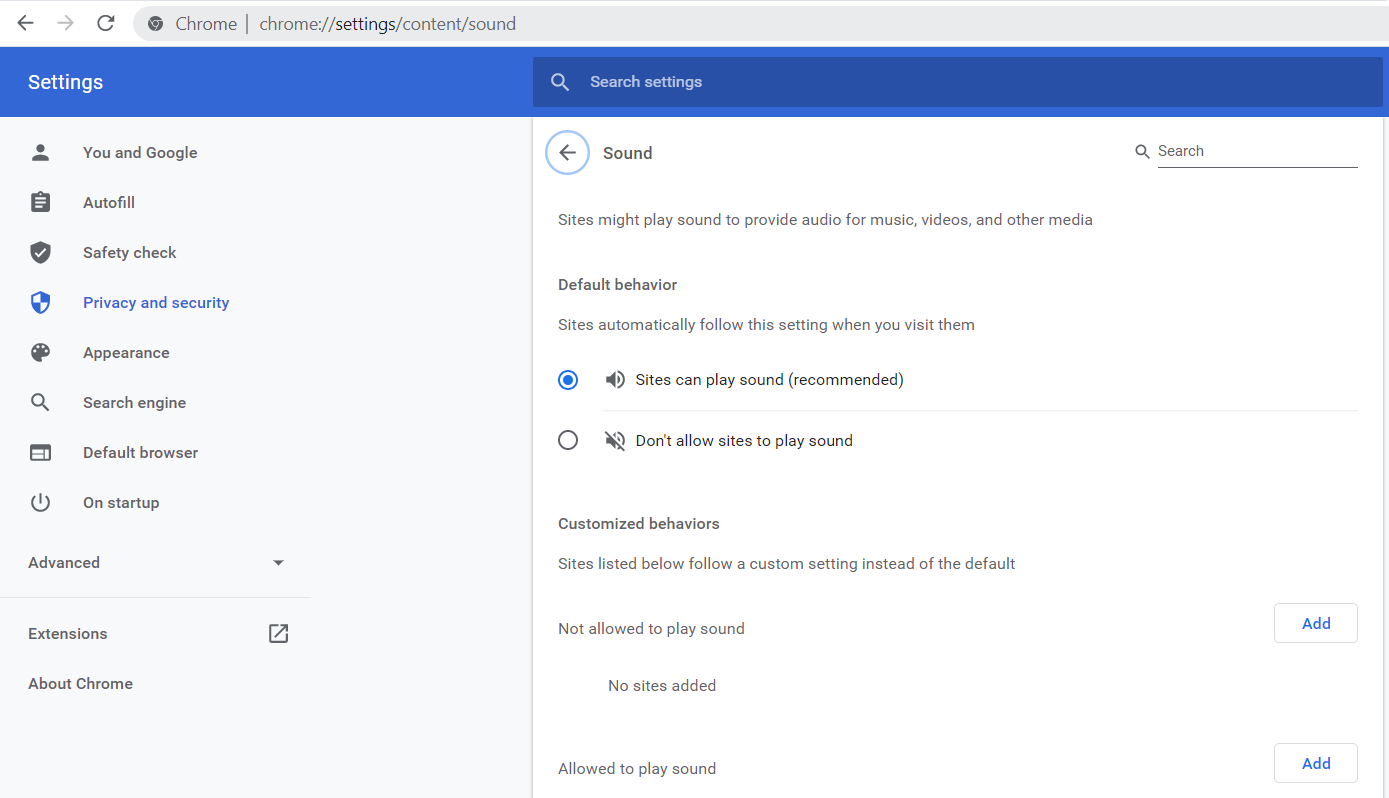
3- Then add the domain esii-orion.com in sites allowing sound section :
Reception of users
-
Available actions in the advisers'Reception module?
The following table lists the action buttons in the adviser’s reception module, used by them to manage users.
Hardware : Kiosk,...
-
How do I enable identification of appointments on the kiosk?
To enable the identification of users with an appointment on a terminal, simply activate the corresponding option, “Appointment arrival identification” in the settings of the terminal concerned.
Access to the settings of the terminal is in the “Equipment” menu of the administration module.
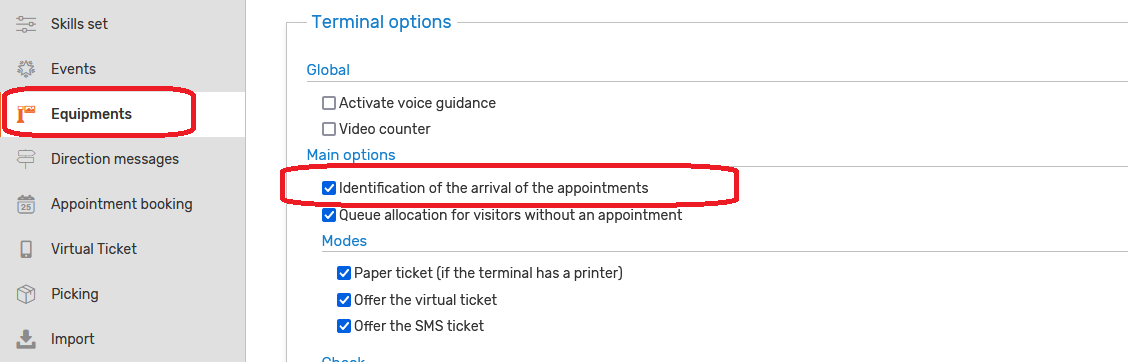
Identification on the terminal is via the QRcode reader if it has one or by entering the appointment code.
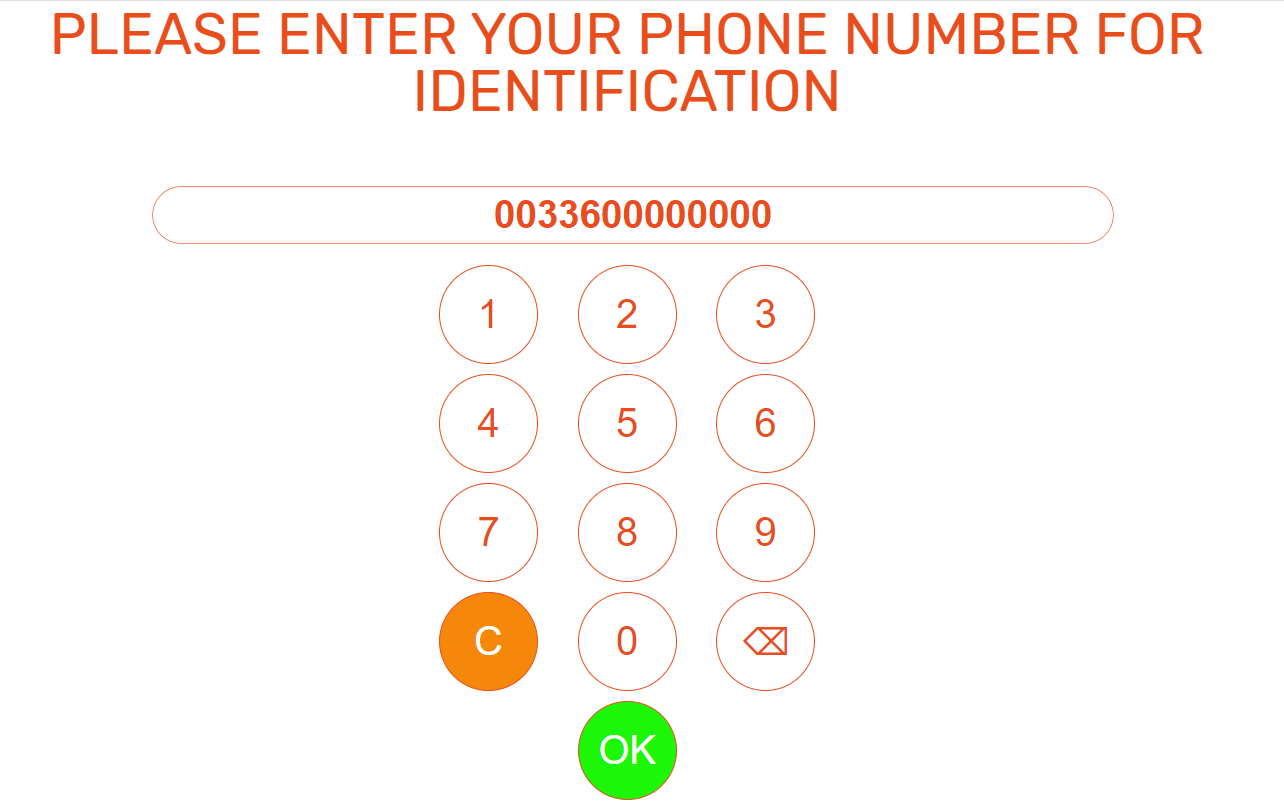
- How is an appointment identified for a user with a foreign number phone?
The identification of an appointment is done on the phone number.
When making an appointment on the Booking module, the default country code proposed is the one defined for the site.
But it is possible to modify it to enter a foreign number by selecting the corresponding area code:
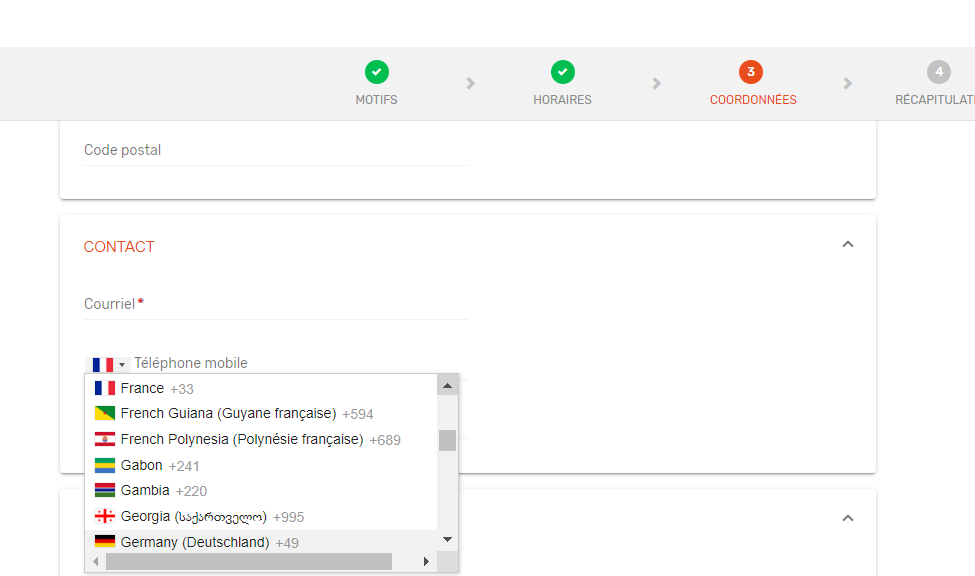
On the day of the appointment, a user with a local number identifies himself without entering the country code at the terminal.
While a user with a foreign number will have to enter his country code (0033;0041;0039) before his number:
- An error message on the kiosk screen following the change of paper?
If the terminal displays the error message "Terminal unavailable" on the screen following the change of the paper roll, make 4 successive clicks on the top left corner, or on the top corner at right of the screen. The kiosk will display the home page again.
Reception of users
-
Unable to pause a user during the interview?
It is possible for an adviser to pause a user during the interview, to allow him to print the documents necessary for the closing of his request for example.
This action momentarily takes the user out of the queue, and allows the advisor to continue receiving the following users, until the user returns.
If the pause action is grayed out:
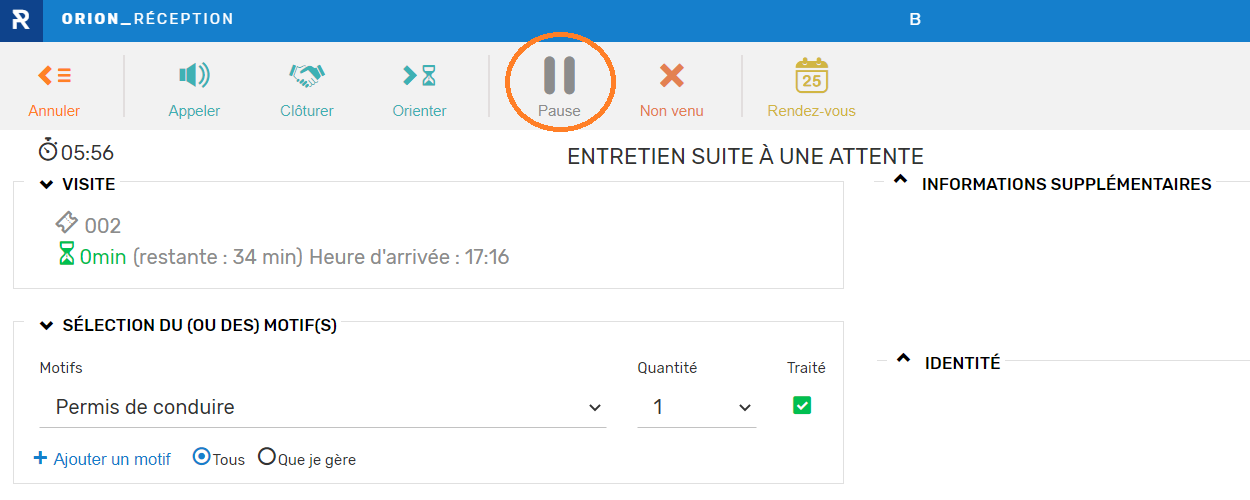
In the SELECTION OF REASON (s) section, all you have to do is uncheck the “Processed” box for the reason for the visit (or one of the reasons, if there are several):
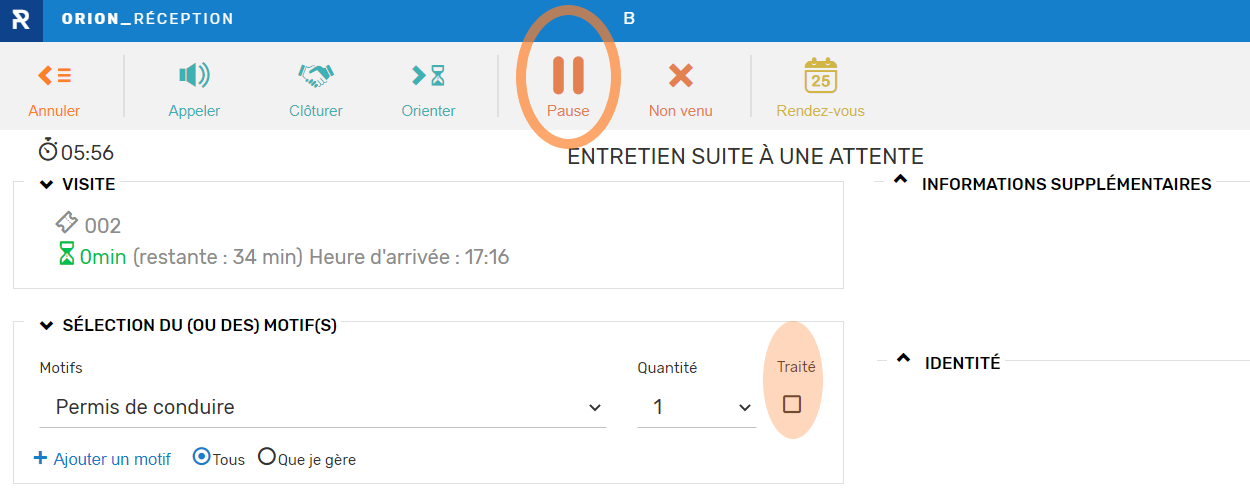
Pausing is then authorized.
Appointment
-
How is the duration of an appointment calculated?
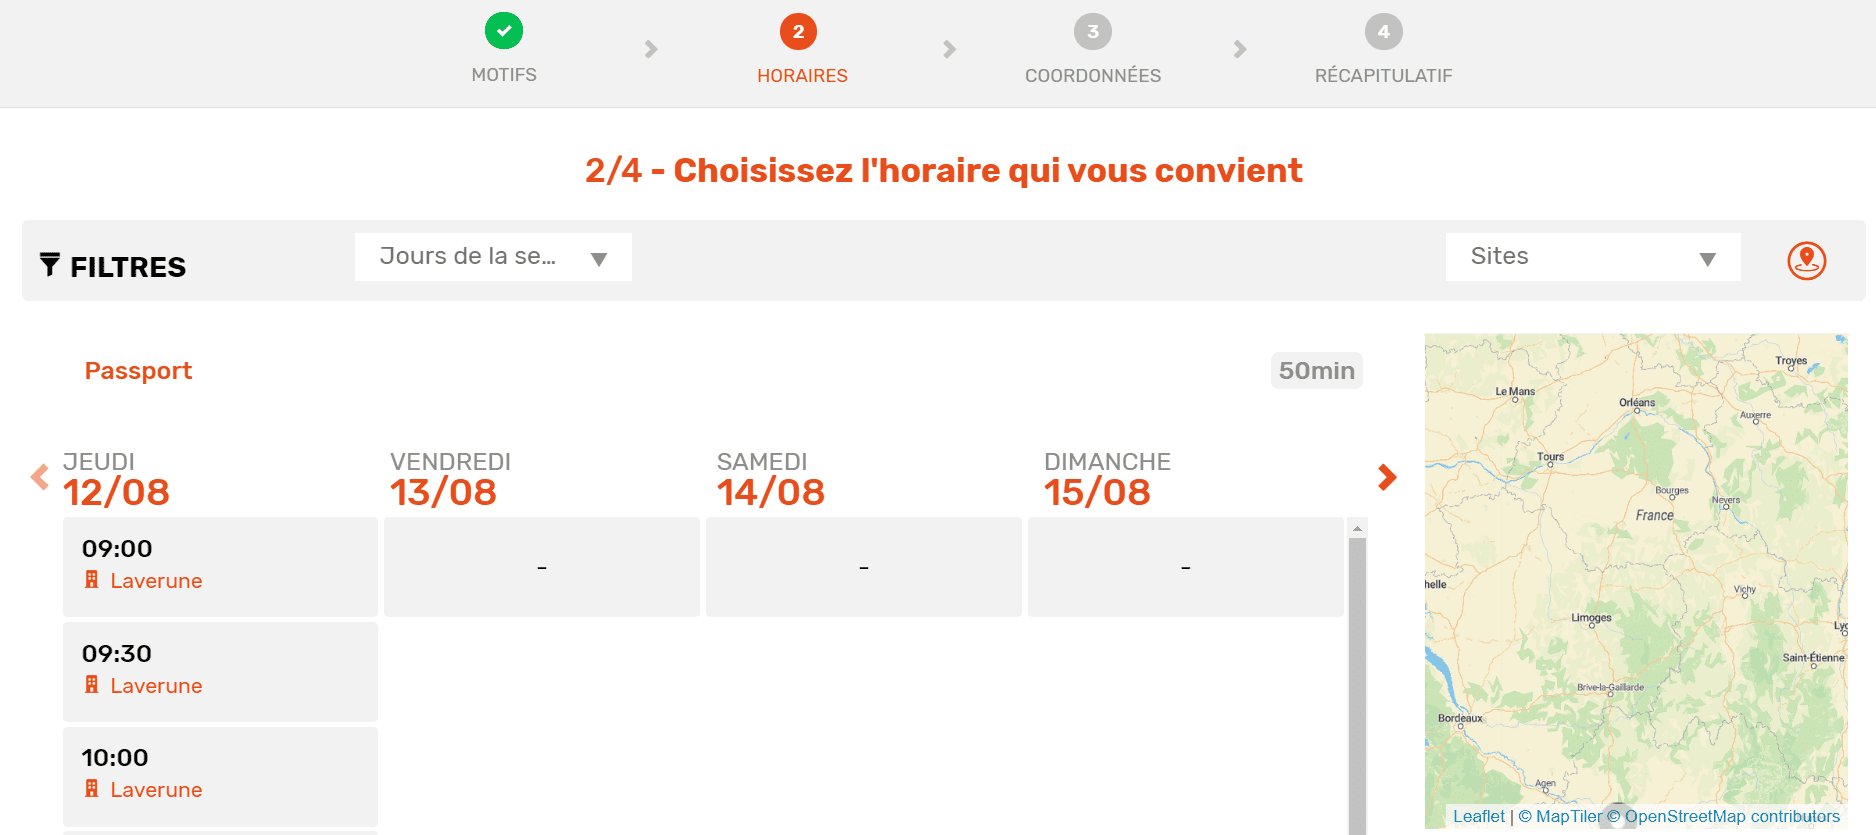
When making an appointment online the user specifies a visit purpose, or several of them (See the video How to make an appointment ?).
The duration of the interview is the time needed to process the selected purpose, or the sum of the processing times of the purposes if several purposes have been entered. That is why it is important to define the processing time for each purpose.
As a reminder, the purposes are accessible via the “Purposes” menu of the administration module.
- The online appointment booking module displays "No availability for now" ?
There are several avenues to explore:
- Have you authorised the booking of appointments for one or more reasons?
See "How to authorise online appointment booking for a reason".
- Have you assigned competences to your resources on these grounds?
See "Discover Orion and competence management".
- Have you reserved booking slots on your different resources?
See "How to make a reservation".
Technical issues
- How to install the corresponding "Reception" module shortcut on a workstation?
Login to the Orion homepage.
Launch the Reception module to display the list of worstations of your site.
Click on the link of the concerned extension to launch the application.
Drag & Drop the URL from the browser to the desktop of the workstation.
To do this:
- Click on the padlock symbol
- Drag and drop to the desktop
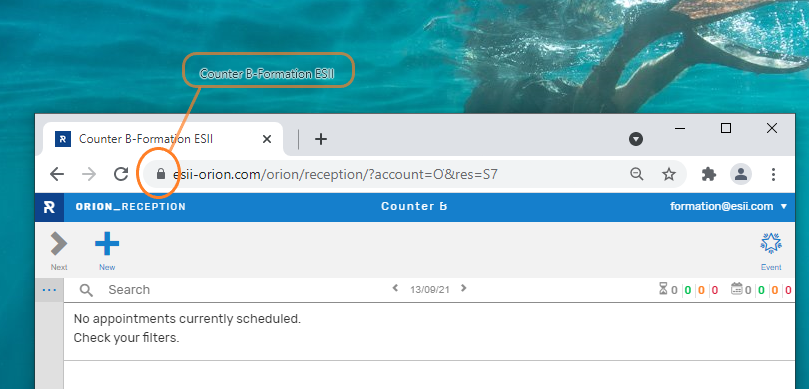
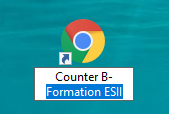
- Rename the shortcut name, keeping only the desktop name "Counter B"
-
How to reschedule cancelled ORION appointments via a CSV file
1. On ORION home page please click on 'Customer base' tile.
2. Select the canceled appointments you'd like to reschedule and click on 'Export data in CSV format with active filters'. Save the .csv file to your PC.
3. Open the .csv file with Microsoft Excel.
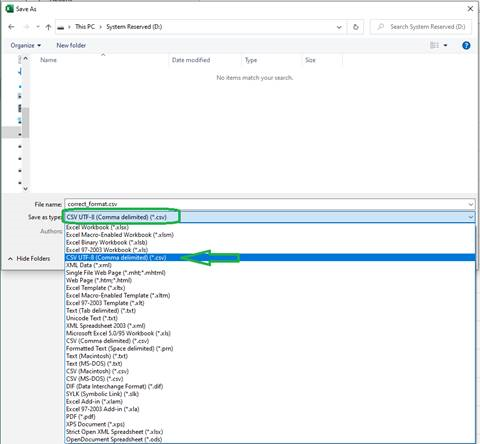
4. Replace columns according to example here enclosed (file ImportModif_martice_EN.csv).
5. Modify the appointment dates as needed 6. Once the changes have been made, save the file in csv UTF-8 format.
7. On ORION home page please click on 'Administration' tile.
8. Select ‘Import’.
9. In 'Appointment' section click on 'Select File' and add your modified .csv file. Please make sure the option 'Send an email as a priority otherwise an SMS to the injected appointments' is left unchecked at this time.
10. Click on 'Inject the appointments' button. Click OK one the pop-up window.
11. Make sure to check if your appointments were imported correctly. If this is not the case, please 'Cancel processing' make the necessary corrections to the file then restart the procedure.
If on the other hand you're satisfied with the result, click on 'Cancel processing' then reinject the file making sure the option 'Send an email as a priority otherwise an SMS to the injected appointments' is now checked.
- Can I import my users into Orion?
Orion allows users of the solution to be imported from a csv file.
A template is available directly on the import interface. To access it, go to the “Users” tab of the “Import” menu:
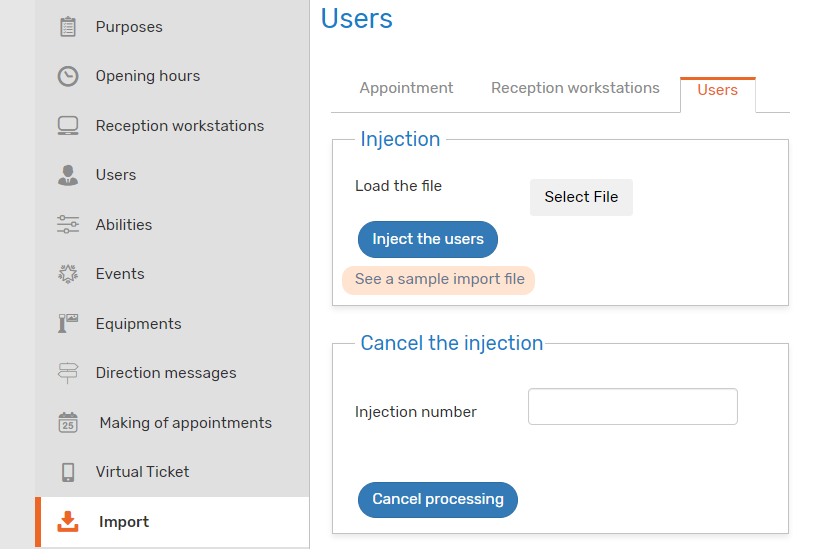
The user import template file is downloadable by clicking on the “See a sample import file” link in the ‘Injection’ section.
Once this file has been filled in, simply inject it using the corresponding button and then validate by clicking on the “Inject the users” button.
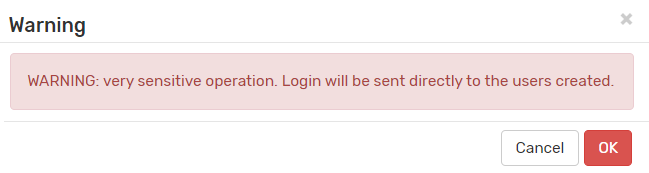
A pop-up reminds you that adding a user is invoiced :
Once the file is injected, a processing number is displayed in the ‘Cancel the injection’ section, along with the number of rows processed.
Clicking on the number of processed rows shows you the details of the operation:
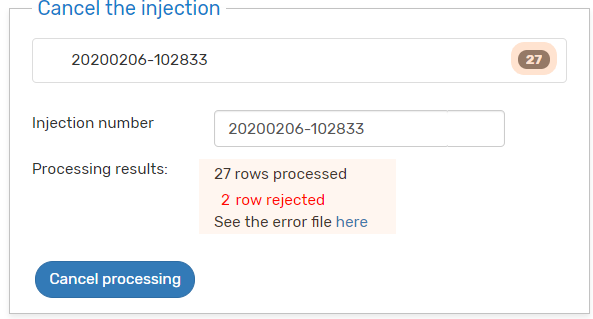
This allows you to cancel the operation if errors were reported using the “Cancel the processing” button.
Registered users can be accessed from the corresponding menu in the administration dule: